
In this article:
Virtual machines can be added in GNS3 topologies as end devices nodes and can play various roles:
-
Lightweight ones are very focused for instance to provide just enough to test the network connectivity or provide a functional browser.
They start blazingly fast and are very light on resources, meaning you can put several of them to test end-user workstation behavior at several places in your topology with little to no worry about the CPU or memory impact.
-
Dedicated appliances are designed to provide a specific service, like networking (firewall, …), applicative (proxy, email filtering, …) or administrative (monitoring, …) services.
Resource consumption vary greatly depending on the service and the software used by the appliance. However, professional appliances are usually designed to handle a large number of simultaneous operations: some will support with no issue to see the virtual machine resources settings reduced on test environments (some may require a modification in their settings, like reducing a cache size, or may simply not support to run under lower resources).
-
Full-fledged virtual machines could be just anything, from a server system to a end-user workstation, from an infrastructure system to a home computer, etc.
Warning
When adding end device nodes to your GNS3 topologies, don’t confuse VPCS nodes with actual virtual machines nodes.
While virtual machines offer a reasonable level of isolation between the
guest and the host systems, VPCS do not even attempt to provide such
isolation as executing a command on the host from a VPCS guest is as
simple as prefixing it with a !:
PC1> !ls /etc/passwd
/etc/passwd

PC1>
If you want a GNS3 topology to be isolated from the host system and the physical network, don’t use VPCS nodes but use lightweight virtual machines instead.
Ready-made systems
GNS3 appliances
GNS3 provides a centralized place to search for pre-configured GNS3 nodes: the GNS3 marketplace.
It provides:
-
Appliances: these are mostly network-related and barebone free Unix systems.
It can be a good alternative to the manual configuration to install Cisco images (as long as you have one of the exact firmware images expected by the appliance template), but usually this is not really needed.
Regarding the free Unix systems, I usually prefer to install them myself but I suppose it may still help sometimes.
The real jewel here is the Firefox appliance, a Qemu virtual machine maintained by the GNS3 team and relying on TinyCore Linux and providing a very lightweight (256 MB of RAM for the complete virtual machine) yet complete Firefox to simulate end-users in your topologies. This is just a must-have.
-
Software: this is… everything else. It include software stacks, monitoring platforms, utilities, specialized platforms.
In notably includes a template for Kali Linux, but last time I checked it was an old version and, as with other general purpose systems, I find it more practical so simply install it myself than tinkering with someone else’s work.
-
Learning material: The marketplace is not only the place for topology nodes templates, it also provide a large number of learning resources provided by the community.
I did not try any of these, but their advantage compared to other available resources is that the trainer usually provides ready-made GNS3 topologies to work with the course.
Note
Appliance and software templates are just plain text files, not archive files and they do not contain any virtual machine. They only store the GN3 node settings and either:
- A URL to fetch the free virtual machines (from here for appliances maintained by the GNS3 team).
- A filename and a hash allowing to ask you to provide a firmware or an installation disc image and check that it you provided the right file.
When installing a Qemu-based template, you may need to review its settings. In particular
-
If you are not using the US keyboard, you will have to specify your keyboard mapping explicitely.
Go in the Advanced settings tab, section Additional settings and add the additional Qemu parameters matching your keyboard (for instance
-k frfor a french keyboard).Qemu usually stores available keyboard mapping files under the /usr/share/qemu/keymaps directory.
-
If the template uses a single virtual CPU by default, add a second one.
Most virtual machines work better with two vCPU, and as long as you are using a dedicated hardware for you virtual lab (which I advise you to do) you should have enough resources to support this.
Standalone virtual machines
While the GNS3 images maintained directly by the GNS3 project team are high-quality, the quality of the content provided by third-party is very variable.
Third-party appliance and software templates often require outdated and hard-to-find firmware or installation images. While sometimes you can force the template to accept a file by removing or modifying the hash stored in the template file, often it is just easier and safer to simply manually create your own nodes.
A quick alternative to GNS3 appliances is using standalone virtual machines. To find ready-made virtual images, check my dedicated post: Where to find virtual machines and ISO files?
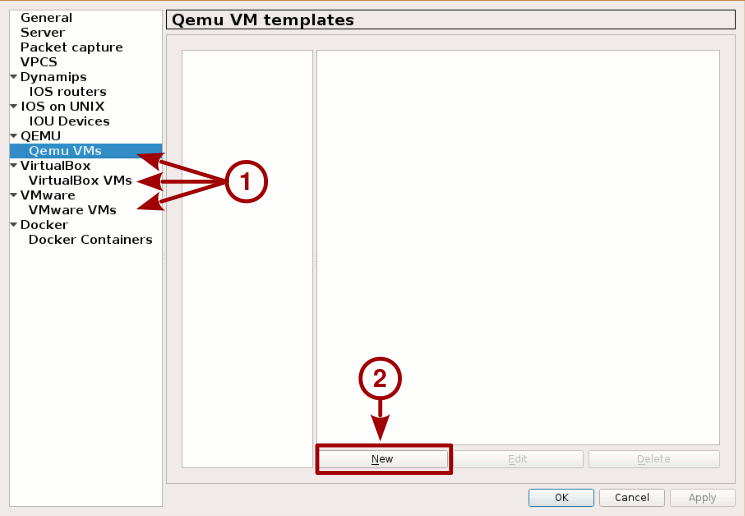
To import a virtual machine, from GNS3 menu bar go in Edit > Preferences. The left pane of the Preferences window should propose you, among other topics, the Qemu VMs, VirtualBox VMs and VMware VMs allowing you to create new GNS3 end device nodes by importing the selected virtual machine.

Note
All things being equal, I personally prefer to use Qemu virtual machines as they are more flexible and reliable thanks to better support of linked based VMs (see below), offer more configuration options and the access to the guest console is more user-friendly (no need to keep its window permanently open).
GNS3 bug
GNS3 currently suffers from some bugs (#2239, #2314) which may crash the GNS3 server when adding a large virtual disk image to it.
The workaround is to manually create a snapshot file like this
qemu-img create -f qcow2 -o backing_file=original-file.qcow2 snapshot-file.qcow2
And then provide the snapshot file to GNS3 instead of the large, original HDD image file.
Linked base VMs
Linked base VMs is a feature natively supported by Qemu, but its support by GNS3 for VMware and VirtualBox is still experimental.
Linked based VMs disabled
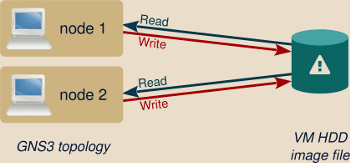
When this feature is not used, adding a virtual machine to a topology makes the GN3 project to directly use this virtual machine HDD image.

This raises several limitations:
-
Any modification made to the virtual machine from within the topology (meaning any disk access or file modification) affects the created virtual machine itself.
Deleting and re-adding the node in your topology won’t rollback anything.
-
The virtual machine you added in your topology and the virtual machine in the End devices menu are the same entity.
Any modification to the virtual machine in one topology affects every other topologies using the same end device node.
-
Such end device nodes can be imported only once in a topology.
For instance you cannot simulate two workstations by adding the same virtual machine twice.
Several of these limitations come from the fact that several nodes cannot access simultaneously the same virtual machine HDD image.
The common but quite inefficient workaround for this situation is to manually create several copies of the same virtual machine, one for each node and for each topology, and import every copies as individual end devices nodes in GNS3.
But a cleaner solution is by using linked base VMs..
Linked based VMs enabled
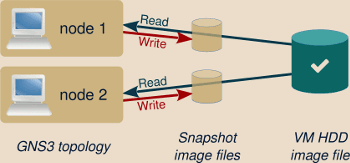
When this feature is used, GNS3 won’t directly access the created virtual machines anymore, instead it will generate a snapshot and store it inside the GNS3 project directory. Such snapshot acts as an intermediary layer over the VM virtual HDD: unmodified data is read from the original virtual machine HDD image file, but all write operations occur only on the snapshot file.

If you add several end devices nodes referring to the same linked base VM, whether in the same topology or in different ones, each one has its own snapshot file, meaning that each one is independent from the others.
Warning
When using linked base VMs, any modification of the base virtual machine, the one initially created and serving as a base for all snapshots, would irremediably invalidate all snapshots files and corrupt all associated end device nodes in your topologies.
To avoid any wrong manipulation of the base virtual machine, GNS3 automatically proposes to copy it in its own directory tree. Depending on the virtual machine size, the operation may take several minutes but is recommended.
You are then free to use the original standalone virtual machine as you like. For instance you may want to use it as a master copy, to regularly generate new updated versions of this virtual machine as new GNS3 end devices nodes.
Create your own virtual machines
Install the OS outside of GNS3
Usually, you can just begin by creating a standalone virtual machine the usual way, then import it into GNS3 as described above.
However, if you are using Qemu and depending on your settings this can induce a change in your virtual hardware properties that your guest system may not like (either because of technical reasons like Windows’ Fast Startup feature or due to license issues as this may be identified as a new computer).
Note
VMware Player virtual machines are less prone to such issues as the virtual machine settings is directly handled by the Player, not by GNS3.
In case of issues, ensure that similar Qemu options are used both inside and outside GNS3. Right-clicking on a running Qemu VM node and using the Command line option shows you the complete Qemu command used by GNS3 to start this guest. New options can be added in the VM node settings, under the Advanced settings tab.
Check in particular the -cpu option: ensuring that you keep the same CPU type
both inside and outside GNS3 solves a lot of issues (GNS3 does not use this
option by default).
Install the OS from within GNS3
For particularly tricky cases or if you prefer doing it this way, you can install the guest operating system directly from within GNS3:
-
Start by creating a new GNS3 node device. When asked to select the disk image file, select the New Image option which should provide you access to the Create button allowing you to create a new, empty disk image file.
-
Ensure that the imported virtual machine does not use linked base VM. To check this, from GNS3 toolbar, go in Edit > Preferences, select your virtual machine, Edit it and, below Advanced settings tab check that the Use as a linked base VM is unchecked.

-
Still in the virtual machine setting window, set any supplementary settings like:
- The number of vCPUs (a minimum of 2 is usually recommended).
- The RAM amount (2 GB is a common choice).
- The console type (usually VNC)
-
Any supplementary required parameters. When using VNC displays you usually need to also enable the USB tablet device, set the keyboard layout and remove the default
-nographicoptions.Your Options field should now contain something like:
-usbdevice tablet -k fr
-
Mount the installation CD-ROM image into the guest system.
-
Create a new topology and add only this device.
If you need Internet connectivity during the installation process, add also a Cloud and an Ethernet switch nodes as Qemu nodes cannot be directly linked to Cloud nodes.
-
Proceed with the guest operating system installation as usual.
-
Once the installation has ended, enable back the Use as a linked base VM option, delete the temporary topology used for the OS installation and, optionally, remove the installation ISO file from the virtual CD-ROM reader.
