
In this article:
Setting-up a basic Windows Active Directory Domains allowing to centrally manage users account can be done painlessly. This guide is mainly based on Peter Kim’s guide written for his book The Hacker Playbook
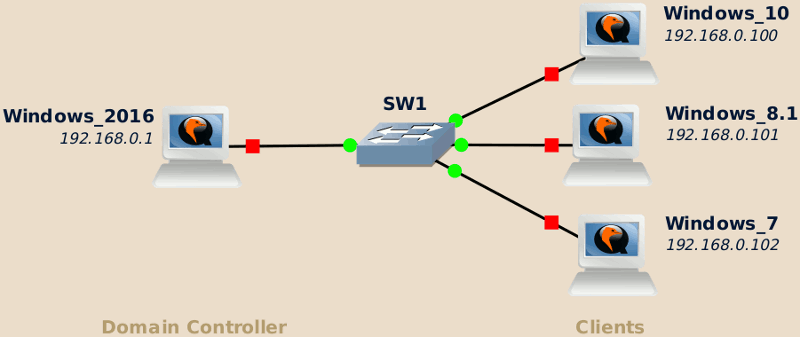
In this guide I use a minimal topology, with on one side a Windows server acting as the domain controller and on the other Windows client systems. This guide should work the same no matter the exact versions of the Windows server and clients you are using or if you are using a more complex and realistic topology.

Note
The Domain Controller must be a Windows Server edition, and for the clients to be able to join the domain they must be at least Windows Professional editions.
Configure the network
Set IP addresses
First you need to set static IP addresses to each host.
The quickest way to access the network settings is by right-clicking on the network icon you should have in the notification bar. Otherwise, you can access it through Settings (or Control Panel) > Network and Internet > Network and Sharing Center.
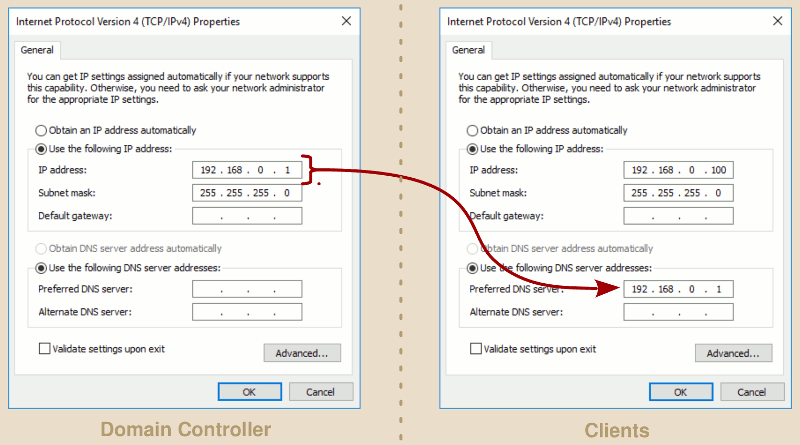
On the Network and Sharing Center screen, select your network adapter and open its Properties. Select Internet Protocol Version 4 (TCP/IPv4) and open the Properties of this protocol.
Set a unique IP address for each host, and set each client to use your Windows server as DNS server.

Set hostnames
Change the hostname of at least the domain controller as it will make pinging it easier in a later step.
The exact location depends on your Windows version:
- Settings > System > About > Rename PC.
- Control Panel > System and Security > System > Change Setting.
On my side I’ve set the domain controller name to dc. Choose any name you like.
Feel free to also change the clients hostname, however this won’t affect the current guide.
Enable the Active Directory Domain Services
In the Server Manager (it should automatically open when opening a session, otherwise it can be found in the Start menu), click on Add roles and features, and enable both Active Directory Domain Services and DNS Server roles.
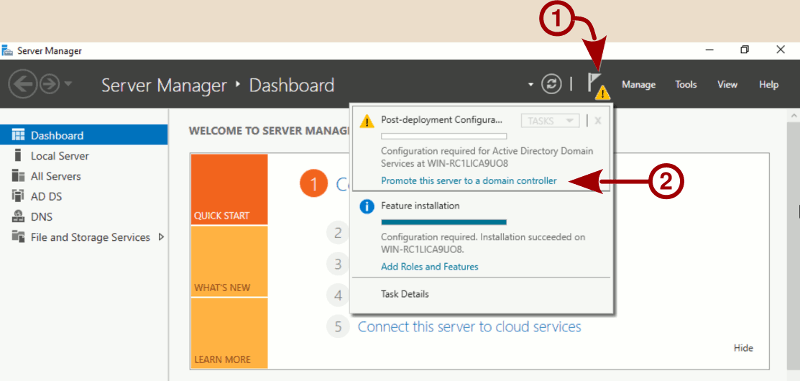
Once the new roles have been installed, you must promote the server as a Domain Controller. On the top bar of the Server Manager you should see a warning sign (➀), click on it then on the Promote this server to a domain controller link (➁).

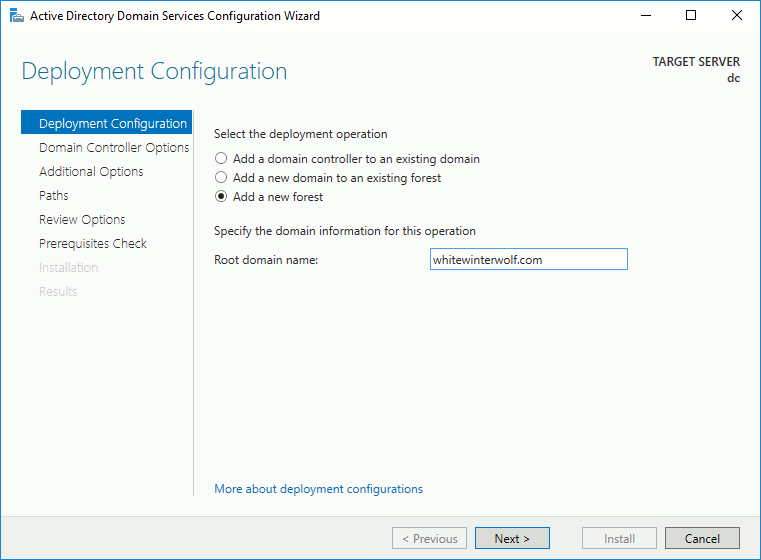
You need to Add a new forest, name your new domain as you like. Here I used whitewinterwolf.com.

The installation process may take some time, once it’s over your domain controller should be ready. Time to connect the clients!
Register the clients to the Active Directory domain
Check that you can ping the domain controller from the clients:
C:\Users\wwwolf>ping dc.whitewinterwolf.com

Pinging dc.whitewinterwolf.com [192.168.0.1] with 32 bytes of data:
Reply from 192.168.0.1: bytes=32 time<1ms TTL=128
Reply from 192.168.0.1: bytes=32 time=1ms TTL=128
Reply from 192.168.0.1: bytes=32 time=1ms TTL=128
Reply from 192.168.0.1: bytes=32 time=1ms TTL=128

Ping statistics for 192.168.0.1:
    Packets: Sent  =4, Received  =4, Lost = 0 (0% loss),
Approximate round trip times in milli-seconds:
    Minimum = Oms, Maximum = 1ms, Average = 0ms

C:\Users\wwwolf>
The location of the option to join an Active Directory domain differs depending on your Windows version:
- Settings > System > About > Connect to work or school > Connect > Join this device to a local Active Directory domain.
- Control Panel > Systems and Security > System > Change Settings.
Type-in the domain name, you should be prompted for the domain administrator login and password to validate the operation.
Create Active Directory users
Back on the domain controller, in the Start menu, under the Windows Administrative Tools section, open Active Directory Users and Computers. Go in the Users section of your domain, then right-click > New > User.

Set a name, a login and a password to this new user. If everything is went right, your should be able to use this newly created user to open a session on you client systems.
